Python
Overview
Python is available on the cluster. Depending on the user's experience and needs, different distributions are available. Below is a non-exhaustive list of installed distributions:
- Anaconda2
- Anaconda3
- Python
- Biopython
Information on available versions can be obtained with the command:
where <distribution-name> is replaced with the name of the distribution you are interested in. For example, to list all installed versions of the Python distribution:
To activate a specific version, enquire about it to find the prerequisites, then load them together with the Python module. For example, for Python 3.6.6:
This provides information about which compiler, CUDA, and/or MPI library combinations are available for that version. Note that the latest Python modules do not include packages such as MPI4PY, numpy, or scipy — for these you need to load a SciPy-bundle. See below.
Please note that to use a distribution that requires CUDA you need to have access to a GPU partition project. For more information on how to use the module system consult the modules guide.
Recommended use
Depending on the needs of the user, we recommend different distributions.
Anaconda distributions
For users without special requirements, the recommended distribution is Anaconda. Anaconda is provided for Python versions 2 and 3, named Anaconda2 and Anaconda3 respectively. These are also the recommended distributions for users who wish to use the interactive environment spyder, though spyder is also provided for a few selected versions of the Python distribution.
To get the full functionality of the Anaconda environment use the following commands:
This enables the full functionality of the conda command.
Creating conda environments
To create reproducible and custom environments with specific versions of Python, NumPy, or any other packages, users are encouraged to create and install packages into a dedicated conda environment. Make sure you have loaded Anaconda3 and activated the conda command with:
Now create a new environment:
This will start the process of creating a new environment:
Collecting package metadata (current_repodata.json): done
Solving environment: done

## Package Plan ##

  environment location: /home/bmjl/.conda/envs/myenv

Proceed ([y]/n)?
Press y to start the process. When the environment has been created:
Preparing transaction: done
Verifying transaction: done
Executing transaction: done
#
# To activate this environment, use
#
#     $ conda activate myenv
#
# To deactivate an active environment, use
#
#     $ conda deactivate
When installing packages into the environment, it is recommended to install all necessary packages at once so that conda can reconcile dependencies. If you plan to use this environment in Jupyter Lab or Jupyter Notebook, include ipykernel and ipython_genutils:
For more information, see the Conda documentation on creating and managing environments.
Once the environment is built, activate it using:
When activated, all package installations (both conda and pip) go into this environment and will not interfere with the base conda environment.
The current default Anaconda and Miniforge modules should be configured to run source config_conda.sh, which allows the use of conda commands in SLURM submission scripts. Older versions may still require source config_conda.sh explicitly before any conda commands in SLURM scripts.
Python distributions
Users planning larger scale calculations potentially using MPI4PY, or requiring specific compilers and libraries, should use the distribution named Python. Note that these require loading prerequisites — compilers, MPI and/or CUDA libraries — as detailed in the Overview section.
There are several versions of toolchains such as foss or intel, each with multiple versions of Python. After choosing a toolchain, use module avail Python to see available versions.
Python distributions requiring a GCCcore module
Starting in 2019, the prerequisites and site-package contents of distributions named Python changed significantly. These modules can be loaded after loading a GCCcore compiler as shown in the module spider output. They do not contain site-packages depending on an MPI or BLAS library (such as MPI4PY, numpy, or scipy). To access such packages, load a SciPy-bundle module, which requires a compiler and MPI module. Use module spider SciPy-bundle to see what is available.
By default SciPy-bundle will load a Python 3 module. If you require Python 2, load it before loading SciPy-bundle.
Biopython
For users working in bioinformatics, one of the Biopython packages is most likely the desired choice.
Bioconda
There are two large Bioconda environments developed as modules for users who need Bioconda software with AI/ML applications:
bioconda/bio-suite-py3.10-tf— built around Keras and TensorFlow with Python 3.10bioconda/bio-suite-py3.12-torch— built around PyTorch with Python 3.12
These are built to fit as many compatible biostatistics packages as possible. Only one conda environment can be active at a time (no additional conda-based modules can be loaded on top). The full list of installed packages can be viewed with conda list, and specific packages searched with conda list | grep <package_name>. Users cannot conda install new packages themselves, but may submit installation requests to LUNARC support.
Python site-packages (aka. Python packages)
The distributions provided by LUNARC have a large number of site-packages installed. Users are encouraged to verify that all needed packages are in place.
Anaconda users can check installed packages with:
All other installations use the pip framework:
LUNARC installed packages
LUNARC staff will install packages in the various distributions (mainly in the non-Anaconda-based ones). If you have packages that may be of use for other users, or if you are having trouble installing a package, please send a support request and LUNARC staff will consider it for inclusion.
User installed packages
Users are also able to install their own packages by creating their own local repository.
Anaconda Python distributions
In Anaconda the user can create their own environment using conda create and conda install. See the Conda environments documentation for details.
Please note: The .conda directory where installed files are located may become large. The default location is in /home/<username>. If space is a problem, consider using your project's nobackup directory instead.
Other Python installations
In all other installations (default or loadable module) users can install their own packages using pip:
This installs package_name into the user's home directory. Make sure the installation location is added to your $PYTHONPATH environment variable (e.g. via a private module file or sourcing a script). The --install-option flag to redirect the installation location is no longer recommended.
Always check using pip list or conda list whether the package is already installed in the selected distribution.
Jupyter Lab
On-Demand Jupyter Lab
LUNARC provides Jupyter Lab on compute nodes through Anaconda, accessible from the On-Demand Applications menu. Jupyter Lab depends on Anaconda3 but can be configured to use other versions of Anaconda3 and can load custom conda environments built with the same conda version.
The On-Demand Jupyter Lab running script gives access to a wide variety of modules: AstroPy, BeautifulSoup, Scikit-Learn, Seaborn, and more. The full list can be viewed with:
If everything you need is on that list with a suitable version, starting Jupyter is exactly as demonstrated in the on-demand applications documentation. Otherwise, create a custom conda environment and enable it as a kernel.
Jupyter Lab via Interactive Terminal
Jupyter Lab can also be run from an interactive terminal session, although you will have to manually copy and paste the link into a browser. This works best using the LUNARC HPC Desktop.
Start an interactive session or choose one of the interactive terminals in the On-Demand Applications menu. For Jupyter Lab, the recommended terminal is under Applications - Visualization. Once the terminal is open, load Anaconda and start:
After a few seconds, Jupyter Lab outputs logs such as:
[I 11:49:07.211 LabApp] JupyterLab extension loaded from /sw/easybuild/software/Anaconda3/2020.11/lib/python3.8/site-packages/jupyterlab
[I 11:49:07.214 LabApp] Serving notebooks from local directory: /home/username
[I 11:49:07.215 LabApp] Jupyter Notebook 6.1.4 is running at:
[I 11:49:07.215 LabApp] http://cn001:8888/?token=a59a11155605a8038b5d61cdab7fde987d56d244b9284fbe
[I 11:49:07.215 LabApp]  or http://127.0.0.1:8888/?token=a59a11155605a8038b5d61cdab7fde987d56d244b9284fbe
[I 11:49:07.215 LabApp] Use Control-C to stop this server and shut down all kernels (twice to skip confirmation).

    To access the notebook, open this file in a browser:
        file:///home/username/.local/share/jupyter/runtime/nbserver-22442-open.html
    Or copy and paste one of these URLs:
        http://cn001:8888/?token=a59a11155605a8038b5d61cdab7fde987d56d244b9284fbe
     or http://127.0.0.1:8888/?token=a59a11155605a8038b5d61cdab7fde987d56d244b9284fbe
The line containing the hostname (e.g. cn001) and token must appear in the output. The hostname depends on the allocated compute node and the token is unique to your session. You cannot use the link with hostname 127.0.0.1 or localhost.
Copy the full URL with the hostname and paste it into a browser running in the LUNARC HPC Desktop.
Share with caution
Any user with whom you share this link can read and write all files in any subdirectory from where Jupyter Lab was started.
Virtual environments
If Jupyter Lab lacks additional packages you need, a customised Jupyter Lab kernel can be a solution.
Building and installing a custom Jupyter Lab kernel
Create a new virtual Anaconda environment and make sure it includes ipykernel, ipython_genutils, and any other required packages. Then activate the environment and register the kernel:
where $KERNEL_NAME is the name you choose (e.g. tensorflow) and $KERNEL_DISPLAY_NAME is its human-readable label (e.g. Python (TensorFlow)).
The new kernel is now ready to use. Proceed with starting Jupyter Lab as described above.
Interactive terminal: Activate the conda virtual environment after the interactive session has started and before starting Jupyter Lab.
Jupyter Lab On-Demand: In the GfxLauncher popup, click "Job settings" below the Project dropdown. In the "Notebook job properties" popup, select "Use custom conda environment" and choose your environment from the dropdown.

If you used an older version of Anaconda3, before selecting your conda environment click "Select Modules", go to the "LMOD Browser" popup, and click the Anaconda3 listed in the Modules box at left. Select the version you want and click "Select".

Running your custom kernel
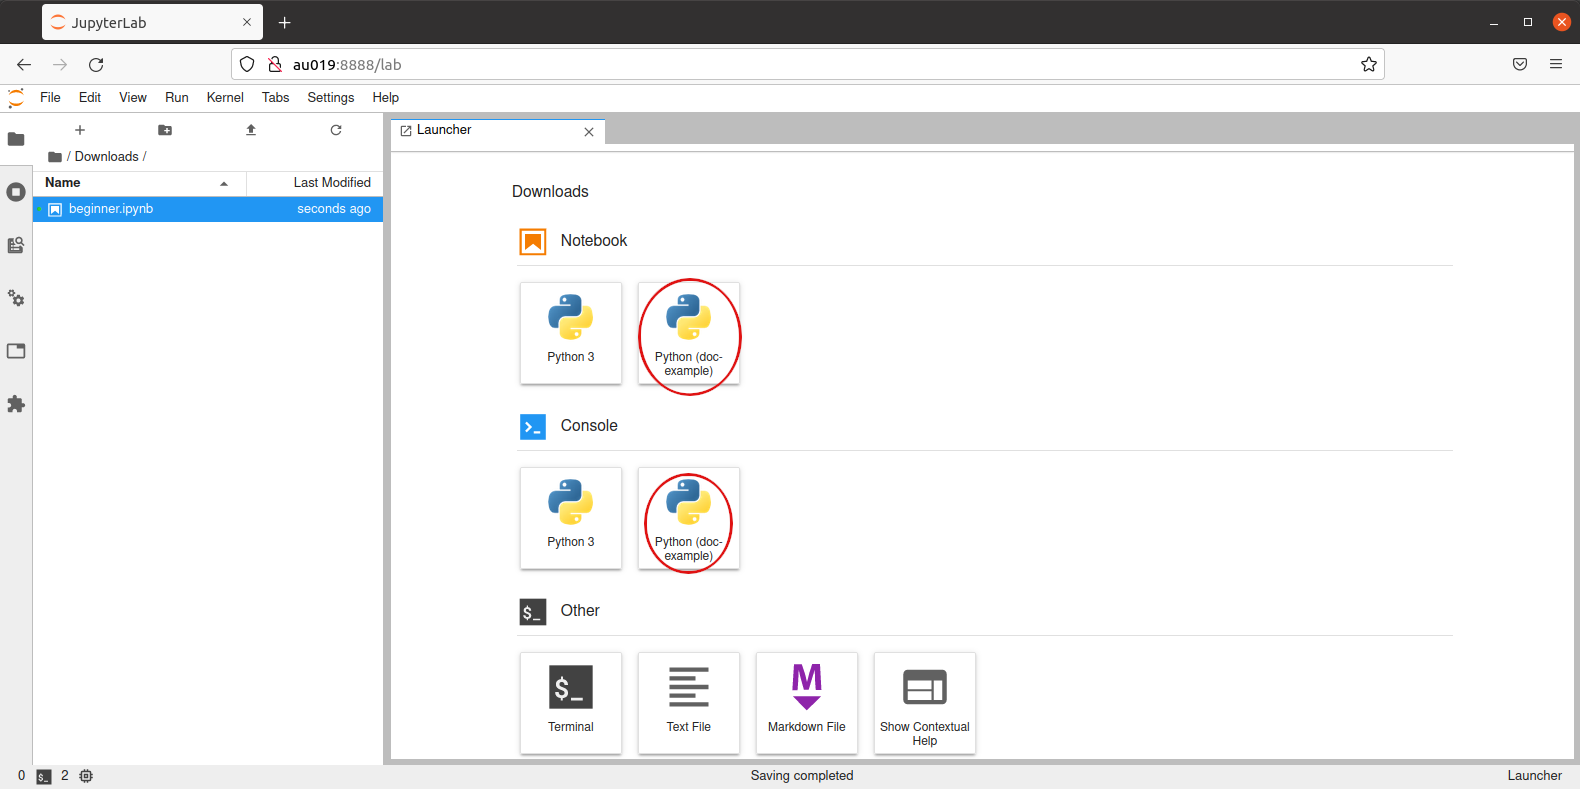
Once registered and Jupyter Lab is opened, try importing a module unique to your environment. The kernel may appear in the Notebook or Console sections of the Jupyter Lab launcher page:
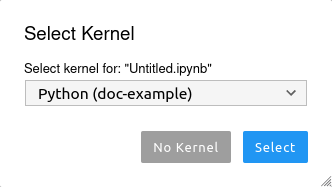
or in the menu Kernel > Change Kernel...:
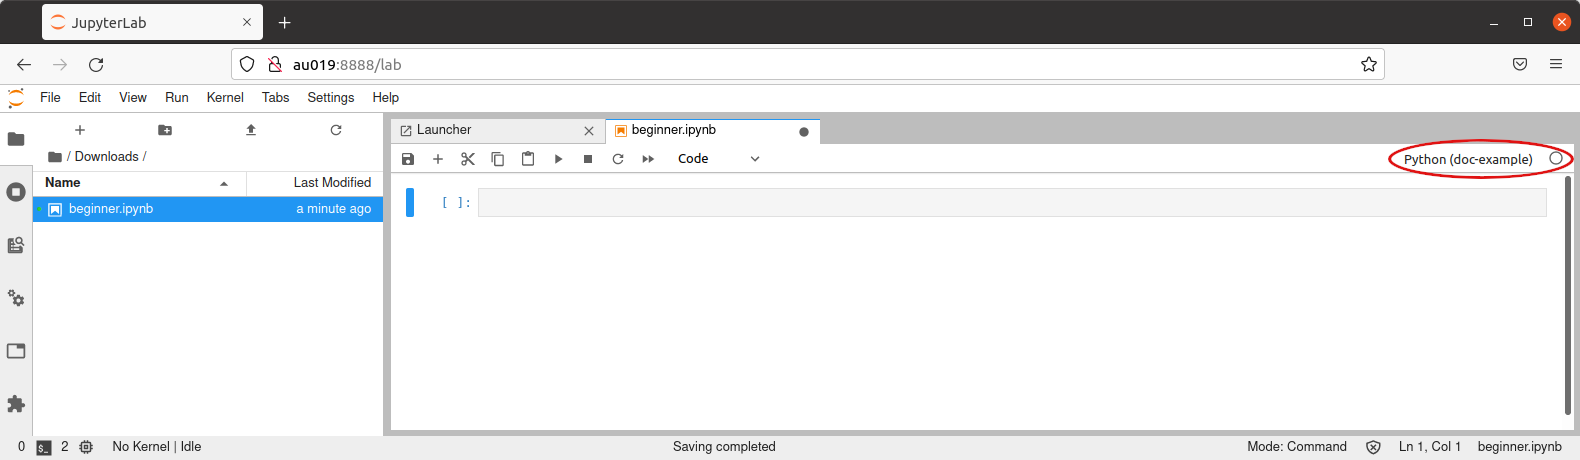
The kernel in use is shown in the upper-right corner:
Removing a custom kernel
Activate the corresponding conda environment and run:
where $KERNEL_NAME is the name of the kernel to remove.
Author: (LUNARC)
Last Updated: 2025-03-26